Bike Bolt Torque Chart: How Tight Is Right
Torque specs for the common bike bolts — stem, rotor, crank, cassette, and pedals — plus the rule that beats any chart: the part's printed value always wins.

On this page
Most bike bolts live in a narrow band: the cockpit and accessory hardware that a torque wrench sees every day sits somewhere around 4 to 14 Nm, while the big drivetrain fasteners (crank bolts, cassette lockrings, pedals) run from roughly 35 up to 55 Nm. The chart at the bottom of this guide gives a typical range for each common bolt. The one rule that outranks every number on it: the value printed on the part, stamped near the bolt, or published by the component's maker always wins. The chart is where you start when nothing is printed. It is not where you stop when something is.
We torque bolts to spec on our own bench for two reasons that pull in opposite directions, which is exactly why a chart helps. Too loose and a stem creaks, a seatpost slips, a rotor bolt backs out mid-descent. Too tight and you crush a carbon bar, strip an alloy thread, or shear an M5 bolt that was never built to take a long lever. A torque wrench keeps you off both rails.
What is the correct torque for a bike bolt?
The correct torque for a bike bolt is the value the component manufacturer publishes for that specific part, and a typical band only when no published value exists. Modern carbon parts (bars, stems, seatposts, frames) carry their own value printed on a sticker near the bolt or molded into the part. That number supersedes any generic chart, because a carbon clamp interface fails at a different load than the aluminum one the chart assumes.
Here is the discipline we use on the bench. Before reaching for a wrench, we look at the part itself: a printed number on the bolt head, the stem face, or the seatpost collar is the spec, full stop. If nothing is printed, we check the maker's website for that model. Only when both come up empty do we fall back to a typical band, set toward its lower end, then re-check the part for slip or creak. The bands below are the workshop-common ranges drawn from Shimano, SRAM, and Campagnolo service documentation, written as ranges rather than single numbers because individual model years sit at different points inside them. A 2018 alloy stem and a current carbon cockpit do not share a face-plate torque even when the bolt looks identical.
How tight should stem and cockpit bolts be?
Stem and cockpit bolts are the lowest-torque, highest-consequence fasteners on the bike: typically around 5 Nm on an aluminum bar, and lower per the carbon bar's own spec. The face-plate clamps the bar, the steerer bolts clamp the fork, and both interfaces are small M5 or M6 hardware that you can over-tighten by hand without feeling it coming. This is the zone where a torque wrench earns its place fastest.
A few practice notes from our mechanics:
- Cross-pattern the face-plate. Stem face-plates use a four-bolt pattern tightened in stages, alternating diagonally opposite bolts: hand-tight to seat, about half the final torque to align, then full torque in the cross-pattern. The goal is an equal gap top and bottom across the bar, not a metal-on-metal slam at one edge. Skipping the stages distorts the clamp face and shows up later as a creak under load.
- Carbon bars defer to the bar maker. A carbon bar's published value is often 4 Nm, sometimes lower, and we never apply the aluminum band to one. A friction paste between bar and clamp lets you hit a safe clamp at a lower torque.
Seatpost binders live in the same register: roughly 4 to 6 Nm on an aluminum frame, lower per a carbon frame's own sticker. The saddle-rail clamp is a touch higher, typically 8 to 12 Nm on a twin-bolt head and 5 to 7 Nm on a single-bolt head, though integrated and aero seatpost heads often spec well above that. This is another fastener to set by the printed value: use the lower of the saddle's or post's two published numbers.
What torque do disc brake and rotor bolts need?
Disc brake hardware splits into two jobs. The 6-bolt rotor bolts run low and brand-specific: Shimano specs 2 to 4 Nm, while SRAM and Avid call for 6.2 Nm. That is more than a 2x spread between brands, so the rotor bolt is a fastener to set by the brand's own number, never by a generic band. Caliper mount bolts run higher, roughly 5 to 10 Nm depending on the brake maker. Rotor bolts are a T25 Torx engagement and, like the face-plate, want a cross-pattern in stages so the rotor seats flat against the hub.
The rotor bolt is where deferring to the part matters most, because published values genuinely diverge by brake brand. Our mechanics keep the numbers as a reminder, not a setting, and check the rotor brand's own spec before the final pass. A rotor bolt set by feel is a common way a brake develops a tick under load, so we finish this one on a torque wrench rather than a hex key by hand.
What torque do crank bolts, cassettes, and pedals take?
Crank bolts, cassette lockrings, and pedals are the high-torque fasteners, clustering between roughly 35 and 50 Nm depending on the interface. These are the values customers ask us about most, because they sit above what a hand applies comfortably and within the range where a wrong number does real damage. Here is how we work through a torque-controlled drivetrain reinstall:
- Identify the interface before you pick a number. A square-taper crank bolt, a Hollowtech II pinch bolt, and a SRAM DUB crank-arm bolt are three different specs on three different cranks. Read the crank, not the chart, first.
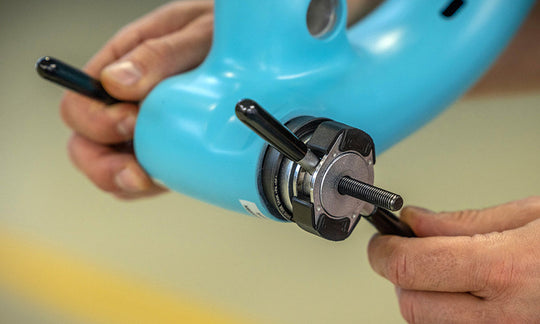
- Set the cassette lockring by maker. Shimano and SRAM HG-pattern lockrings land at a typical 40 Nm; SRAM XD/XDR cassettes run a typical 40 Nm; Campagnolo road and Ekar lockrings run 50 Nm. We anchor the wheel's skewer or axle through the tool so the splines stay engaged under load.
- Match the crank-arm fastener to the crank. Hollowtech II uses two non-drive pinch bolts at a typical 12 to 14 Nm each, torqued in alternating passes so the arm seats square on the spindle. SRAM DUB and GXP cranks have no pinch bolts at all: a single self-extracting crank-arm bolt draws the arm on at 48 to 54 Nm. Read which design is in front of you before you reach for a wrench.
- Never torque the preload cap. The plastic cap that pre-tensions the bearings is a preload adjuster, not a fastener. It takes a token 0.5 to 0.7 Nm by hand and a quarter-turn finish, never a torque-wrench band.
- Finish pedals firmly. Pedal axles thread in at 35 Nm and up — Shimano's own spec runs 35 to 55 Nm — and the left pedal is left-hand thread. We grease the threads and run them to the firm end of that band, because a pedal that backs out strips the crank arm on the way.
Square-taper and splined crank bolts sit in a wider 35 to 50 Nm band, and the bottom-bracket cup install (Hollowtech II external, DUB threaded, Octalink) lands in the same neighborhood. Every value here defers to the groupset's published service spec; the bands are the starting reference for a build where the original torque card is long gone.
Which torque wrench covers which jobs?
No single wrench reads the whole bike well, because the cockpit band and the crank band sit too far apart for one tool to be accurate across both. In our experience two wrenches cover almost everything: a low-range tool for the 2 to 24 Nm cockpit-through-rotor work, and a high-range tool for the 35 to 110 Nm crank-and-cassette work.
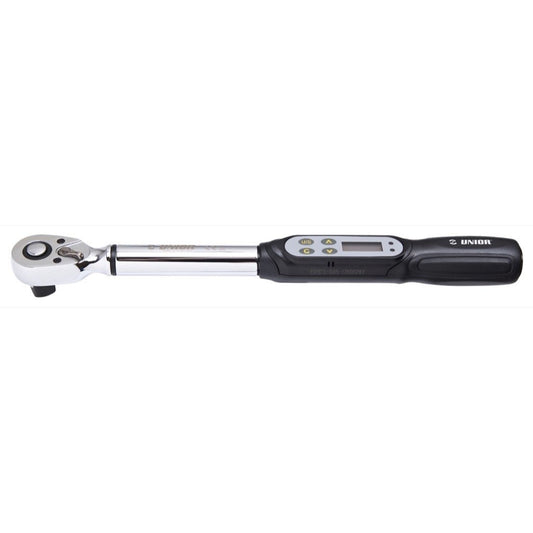
Unior has been forging hand tools in Zreče since 1919, and is the official technical partner of multiple World Tour and downhill teams. The torque wrenches we use on the bench are laser-calibrated, not the click-and-hope hardware that drifts out of spec after a season. The Electronic Torque Wrench 4.2 to 85Nm reads its target on a display and signals when you reach it, which removes the guesswork on the high-consequence carbon-cockpit settings where a click wrench's overshoot is the failure mode.
Pro tip from our mechanics
A torque chart tells you the number, but not that the carbon bar's own sticker says 4 Nm, or that the cross-pattern is what keeps a face-plate flat. The number is half the job; the sequence and the part-check are the other half. When we set a cockpit on the bench, we read the part first, set the tool second, and cross-pattern third, in that order every time. For the full walk-through of which wrench reaches which fastener and why the band differs by interface, here is where the torque-wrench choice earns its keep: How to choose and use a bike torque wrench →
Bike bolt torque cheat sheet
These are typical ranges. The component manufacturer's published value, printed on the part or its spec sheet, always overrides the chart. Set toward the lower end of a band when no published spec exists, then re-check the part for slip or creak.
| Bolt / interface | Typical torque (Nm) | Tool |
|---|---|---|
| Stem face-plate clamp (alloy bar) | ~5 Nm; lower per carbon bar spec | Slipper Torque Wrench 2 to 24Nm |
| Stem steerer clamp | ~5 Nm; lower per carbon steerer spec | Slipper Torque Wrench 2 to 24Nm |
| Seatpost binder | 4–6 Nm; lower per carbon frame spec | Slipper Torque Wrench 2 to 24Nm |
| Saddle-rail clamp | 8–12 Nm twin-bolt; 5–7 Nm single-bolt; integrated heads per printed spec | Slipper Torque Wrench 2 to 24Nm |
| 6-bolt rotor bolts (T25) | Shimano 2–4 Nm; SRAM/Avid 6.2 Nm — set by rotor brand | Slipper Torque Wrench 2 to 24Nm |
| Brake caliper mount bolts | 5–10 Nm, per brake maker | Slipper Torque Wrench 2 to 24Nm |
| Hollowtech II crank pinch bolts | 12–14 Nm each | Electronic Torque Wrench 4.2 to 85Nm |
| SRAM DUB / GXP crank-arm bolt (8 mm hex, self-extracting — no pinch bolt) | 48–54 Nm | Slipper Torque Wrench 5 to 110Nm |
| BB bearing preload cap | 0.5–0.7 Nm (hand-tight only) | hand, not a torque wrench |
| Square-taper / splined crank bolt | 35–50 Nm | Slipper Torque Wrench 5 to 110Nm |
| Cassette lockring (Shimano / SRAM HG) | ~40 Nm | Slipper Torque Wrench 5 to 110Nm |
| Cassette lockring (SRAM XD / XDR) | ~40 Nm | Slipper Torque Wrench 5 to 110Nm |
| Cassette lockring (Campagnolo) | 50 Nm | Slipper Torque Wrench 5 to 110Nm |
| Pedal axle (left is left-hand thread) | 35–55 Nm (Shimano) | Slipper Torque Wrench 5 to 110Nm |
The wrench gets you to the number. Reading the part first is what gets you to the right number. The chart above is the reference we keep on the bench for the bolts that came in with the torque card long gone.
The torque wrench collection covers both bands in this chart, from the 2–24 Nm cockpit wrench to the 5–110 Nm drivetrain wrench.
Tools used in this guide
Straight from the article — no hunting through the catalog.
-
Slipper Torque Wrench 2 to 24Nm
Regular price $114.99 USDRegular priceUnit price per -
Slipper Torque Wrench 5 to 110Nm
Regular price $124.99 USDRegular priceUnit price per -
Electronic Torque Wrench 4.2 to 85Nm
Regular price $299.99 USDRegular priceUnit price per