How to use a torque wrench on your bike
A workshop guide to using a slipper-type torque wrench on bike fasteners. Covers technique, scale reading, the low-torque/high-torque split, common bike values, and the calibration habits that keep the tool honest.
On this page
To use a torque wrench on a bike: set the dial to the fastener's published Nm value, pull smoothly in the marked direction until the head slips with an audible click, and stop there. A torque wrench is the cheapest insurance you can buy on a modern bike. Carbon bars fail invisibly under overload, and the cracks rarely show until a hard ride later. Aluminum stem face-plates distort under load when you guess. Crank-arm pinch bolts loosen when you under-torque them and strip threads when you over-torque them, with both failure modes sitting within a window only a few Nm wide. By the time a fastener feels “tight enough” by hand, the part has either backed off or you've already left a load-line in the clamp face that turns into a creak two rides later.
Most experienced mechanics still calibrate against a torque wrench rather than against memory; the fasteners on a bike are spread across a wide enough range, with enough material-specific limits, that “feel” is unreliable across the catalog. This guide is for using a slipper-type torque wrench: how it works, how to set and pull it cleanly, what to torque, and the maintenance habits that keep the tool reading honest over time.
Why bikes need torque control
Two pressures push every modern bike toward a published torque value.
Lightweight materials don't forgive overload. Carbon composite parts (bars, posts, steerers, some frames) fail differently from steel: instead of yielding under overload, they crush, delaminate, or crack. The damage is often invisible at the surface and shows up later as a sudden failure under load. A 5 Nm stem face-plate bolt at 8 Nm is a near-miss; the same bolt at 12 Nm has already done damage to a carbon bar even if nothing is visibly wrong.
The torque bands on a bike span a very wide range. Bottle-cage bolts live at 3–4 Nm. Stem face-plate bolts live at 5 Nm. Crank-arm bolts live at 35–50 Nm. Cassette lockrings live at 40 Nm. Pedal threads at 35–40 Nm. The same hand that can guess a 5 Nm bolt within 1 Nm cannot guess a 40 Nm bolt within 5 Nm; the fingers do not have the resolution at the higher end. A torque wrench gives the bench a single calibrated reference that works across that whole range.
The two-torque-range reality
A working shop runs two torque wrenches because the bike's fastener population splits cleanly into two bands.
Low-torque band (under ~24 Nm). Stem face-plate clamp bolts, steerer clamp bolts, brake-lever clamp bolts, brake-rotor bolts (6-bolt ISO), brake-caliper mount bolts, seatpost binder bolts, bottle-cage bolts, derailleur hanger bolts, SPD cleat bolts, chainring bolts (modern direct-mount), Hollowtech II non-drive pinch bolts. Carbon and alloy cockpit work lives here.
High-torque band (above ~25 Nm). Cassette lockring, crank-arm bolt (square-taper, ISIS, splined), BB cup install, pedal install, Centerlock rotor lockring. The fasteners that hold the drivetrain to the bike.
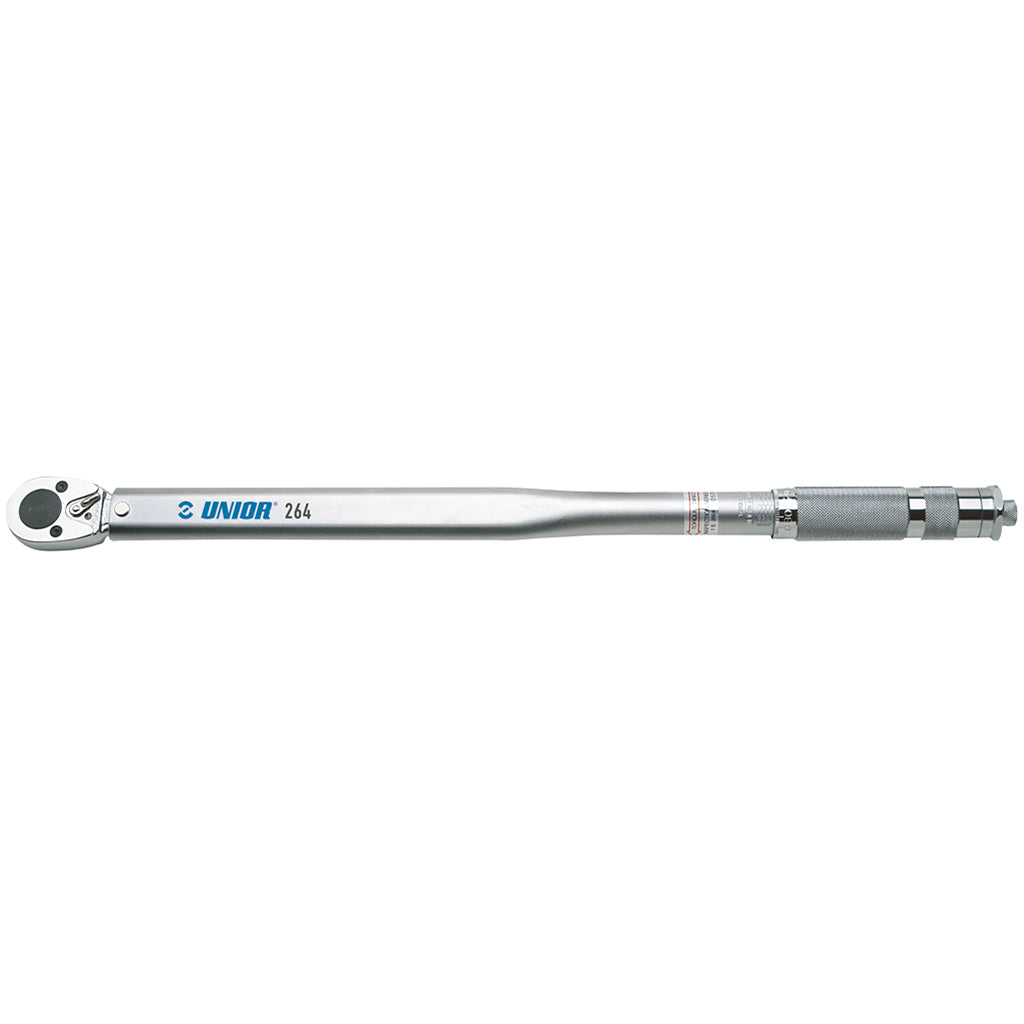
The Slipper Torque Wrench 2–24 Nm lives in the low band; the Slipper Torque Wrench 5–110 Nm lives in the high band. The two wrenches overlap from 5 to 24 Nm so a draft set in the overlap region can use either. For a working shop, the two-tool pair handles every torque-controlled fastener on a current-generation bike.
What a slipper-type torque wrench actually does
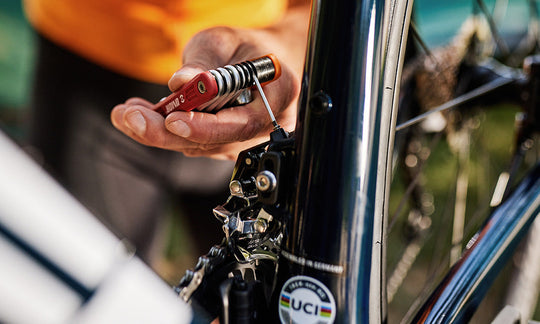
A slipper torque wrench (also called a click-type or preset torque wrench) uses an internal spring-loaded mechanism that releases at the set torque. As the wrench is pulled in the tightening direction, the spring resists rotation until the applied torque matches the dial setting; at that point the mechanism slips through a calibrated angle and produces an audible and tactile click. The click is the signal to stop.
The mechanism is one-way. The wrench measures torque only in the direction marked on the handle (clockwise on the standard models). Pulling it in the other direction or using it to break loose a stuck fastener bypasses the spring and distorts the calibration. Treat the slipper torque wrench as a tightening-only tool.
The 264 series (the family both Unior slipper wrenches sit in) carries a reversible ratchet head, so the ratchet can engage in either direction for fastener access, but the torque-controlled stroke is still one-way. Reverse engagement is for repositioning the handle, not for breaking torque.
How to set and pull a slipper torque wrench
Five steps that the bench should run for every fastener. Once these become habit, the wrench reads honest values and the fasteners reach the right load.
- Set the dial. Use the micrometer-style adjustment to bring the main scale to the integer Nm value, then turn the fine adjuster to add the fractional Nm. Lock the dial if the wrench has a lock collar. The Unior 264 series shows a dual scale (Nm on the primary; Kgm or lbf-ft on the secondary depending on variant). Work in Nm unless the manufacturer's spec sheet publishes the value in a different unit.
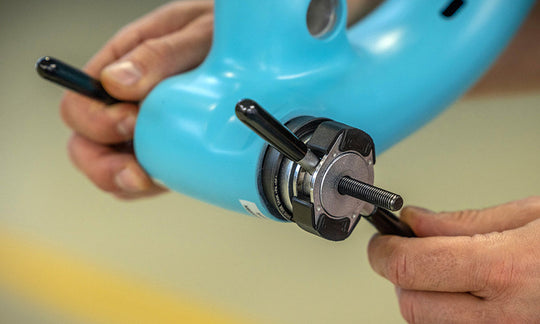
- Seat the socket. Match the socket to the fastener with the right working geometry: hex bit on a 1/4" or 3/8" drive adapter, six-point socket for an external lockring, splined socket for a Centerlock rotor or cassette. A loose-fitting socket rounds the fastener before the wrench ever clicks.
- Pull slow and smooth, perpendicular to the fastener. Sudden jerks or off-axis pulls give the spring mechanism a false reading. Apply pressure in a single steady motion; the wrench responds to the integrated load, not to peak instantaneous force.
- Stop at the first click. A second click is a second torque event on the fastener; the bolt is now at well above the set value. The slipper signals once per pull and the pull stops on that signal.
- Reset to zero at the end of the session. Most slipper torque wrenches store at the bottom of their range to keep the spring relaxed and the calibration stable. The Unior 264 series ships with the same instruction: return the dial to the starting point after use. Storing a torque wrench at the top of its scale shortens its calibration life.
For multi-bolt patterns like stem face-plates, chainrings, brake calipers, and rotor bolts, run a cross-pattern in stages: hand-tight to seat the parts, then half-target torque around the bolts in cross-pattern, then final torque in the same cross-pattern. Skipping the cross-pattern stages distorts the clamp face and shows up as a creak under load.
Common bike torque values
A working reference for the fasteners that account for most everyday torque-wrench use. Specific bolts always defer to the component manufacturer's published spec, which is typically stamped on the bolt head, printed on the component, or in the manufacturer's service documentation.
| Fastener | Typical torque | Wrench |
|---|---|---|
| Bottle-cage bolts (M5) | 3–4 Nm | 2–24 Nm |
| Stem face-plate clamp bolts (M5/M6) | ~5 Nm aluminum bars; lower per carbon bar spec | 2–24 Nm |
| Stem steerer clamp bolts (M5/M6) | ~5 Nm typical; lower per carbon steerer spec | 2–24 Nm |
| Brake-rotor bolts (6-bolt ISO, T25 Torx) | 5–6 Nm typical (Shimano 2–4, SRAM 5.5, Hope 6) | 2–24 Nm |
| Brake-lever clamp bolts (M5) | 5–6 Nm (Shimano 6–8 road; SRAM 5–7 AXS) | 2–24 Nm |
| Brake-caliper mount bolts (M6) | 6–8 Nm post-mount; 8–10 Nm flat-mount | 2–24 Nm |
| SPD cleat bolts (M5) | 5–6 Nm | 2–24 Nm |
| Seatpost binder bolt (M5/M6) | 4–6 Nm aluminum; lower per carbon frame spec | 2–24 Nm |
| Saddle-rail clamp bolts | 8–12 Nm twin-bolt; 5–7 Nm single-bolt | 2–24 Nm |
| Chainring bolts (T30 Torx, direct-mount) | 12–14 Nm | 2–24 Nm |
| Hollowtech II pinch bolts (M5) | 12–14 Nm per bolt | 2–24 Nm |
| SRAM DUB / GXP pinch bolts (M5) | 8.5–10 Nm | 2–24 Nm |
| Cap preload (Hollowtech II / DUB / GXP plastic cap) | 0.5–0.7 Nm | hand-tight; below most wrench floors |
| Cassette lockring (Shimano HG, SRAM HG) | 40 Nm | 5–110 Nm |
| Cassette lockring (SRAM XD/XDR, Eagle 12s) | 35–45 Nm | 5–110 Nm |
| Cassette lockring (Campagnolo road, Ekar 13s) | 50 Nm | 5–110 Nm |
| Square-taper crank bolt (M8) | 35–50 Nm | 5–110 Nm |
| ISIS / Octalink crank bolt (M15) | 40–50 Nm | 5–110 Nm |
| Hollowtech II BB external cup | 35–50 Nm | 5–110 Nm |
| SRAM DUB threaded BB cup | 34–41 Nm | 5–110 Nm |
| Pedal install (9/16″ × 20 TPI) | 35–40 Nm (Shimano publishes 35; some makers 40) | 5–110 Nm |
| Centerlock rotor lockring | 40 Nm | 5–110 Nm |
The hedged-range form (35–50 Nm rather than a single value) is the appropriate level of precision; manufacturers publish the band, and individual model years sit at different points within it. A draft naming a specific bolt always defers to the component manufacturer's number when one is on the head, the component, or the manufacturer's website.
What not to do with a slipper torque wrench
A short list of bench habits that age a slipper torque wrench out of calibration faster than its working life should allow.
Do not use the wrench to loosen bolts. The slipper mechanism is calibrated for one-way tightening. Loosening engages the spring in the wrong direction, can over-stress the internal mechanism, and shifts the calibration. The reversible ratchet head lets the wrench engage either way; the torque-controlled stroke is still tightening-only.
Do not use the wrench on left-hand threads. A left-pedal install or a Campagnolo Ultra-Torque drive-side cup runs the wrench in its torque-controlled direction but against the slipper's intended geometry on most non-symmetric mechanisms. Tighten the left fastener with a non-torque-controlled tool first, then verify the final value with a wrench that supports bidirectional torque measurement (an electronic torque wrench reads in both directions) if a hard spec value is required.
Do not store the wrench at the top of its scale. Storing the spring under load shortens its calibration life. Reset the dial to the bottom of the scale (or to the manufacturer's published “store position”) after each session.
Do not skip the recalibration interval. Unior publishes 12 months or approximately 5,000 cycles for the 264 series. Whichever comes first. A torque wrench past its recalibration interval is a tool with an unknown error band; the calibration certificate is what makes the reading trustworthy.
Choosing the right slipper torque wrench
The two-wrench pair is the bench-side reality for a current-generation bike. The Slipper Torque Wrench 2–24 Nm handles the cockpit, brake, rotor, seatpost, and pinch-bolt range; the Slipper Torque Wrench 5–110 Nm handles the cassette, crank, BB, pedal, and Centerlock range. The overlap from 5 to 24 Nm lets either tool reach the chainring bolts and the Hollowtech II pinch bolts, but the lower-range wrench reads finer values at the cockpit end and the higher-range wrench reads cleaner values at the drivetrain end.
For a home mechanic servicing a single bike, the 2–24 Nm wrench covers the everyday cockpit work; the 5–110 Nm joins the bench when a cassette, crank, BB, or pedal job is due. If the bench services e-bikes, gravel, mountain, and road in the same week, the two-wrench pair is the working minimum.
Both wrenches share the same one-way spring mechanism, ISO 6789 compliance, and the 12-month-or-5,000-cycle recalibration cadence the calibration certificate is built around. Past that interval the reading is a guess, not a measurement.
Looking for the published values themselves? The bike bolt torque chart lists them fastener by fastener, and the torque wrench collection covers both bands described above.