How to Use a Cone Wrench: Hub Cone Adjustment, Sizes & Sets
What a cone wrench is for, the step-by-step hub cone adjustment, which sizes fit which hubs, and how far a regular wrench can take you instead.
On this page
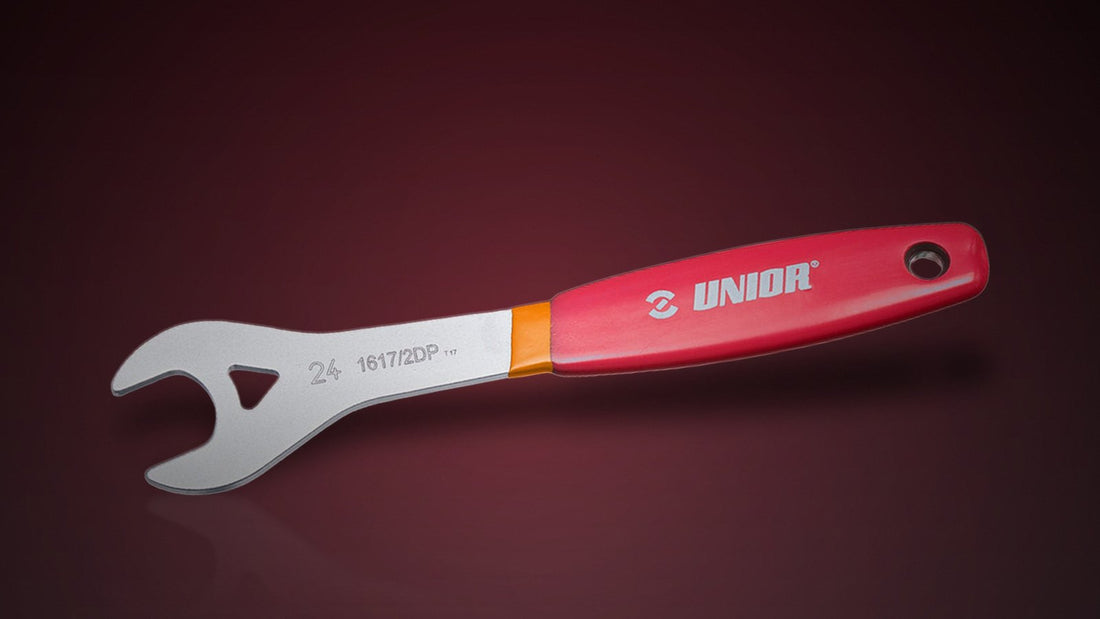
A cone wrench is a thin open-end wrench, about 2 mm across the jaw where a standard wrench runs about 7 mm, made to grip the shallow flats on the cone nut of a cup-and-cone hub bearing. Its job is bearing preload: the cone's position on the axle decides whether the wheel spins free, knocks, or binds, and the cone wrench is the tool that moves it. This guide covers what the wrench is for, the step-by-step hub cone adjustment, which sizes fit which hubs, and how far you can get with a regular wrench instead (not far).
The hubs that need this tool are not going away. Cup-and-cone is the adjustable, rebuildable bearing design, and Shimano still builds many current hubs around it. The adjustment takes two thin wrenches and ten minutes of feel, and the difference between right and wrong is something your fingertips report directly.
What is a cone wrench used for?
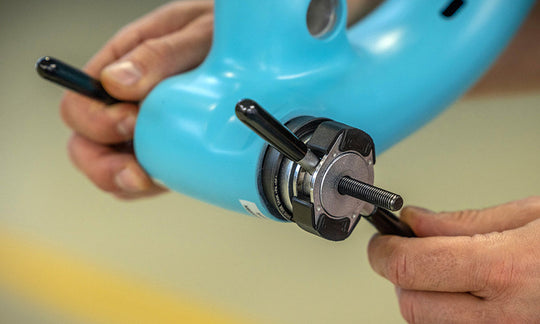
A cone wrench is used to adjust the cones of cup-and-cone bearings: the threaded, cone-shaped nuts on a hub axle that set how much preload the ball bearings run under. The cone carries two shallow parallel flats, and only a thin-jaw wrench can engage those flats in the few millimeters of space between the cone and the locknut that secures it.
The same thin jaw picks up other low-torque work around the bike: threaded headset cones, brake-caliper lockrings, and the older locknut stacks that share the cone-and-locknut layout. But hub cones are the main event, and they are why cone wrenches work in pairs. One wrench holds the cone at the preload you chose; the second tightens the locknut against it so the setting cannot move. Skip the counter-hold and the locknut drags the cone around with it, wiping out the adjustment you just found.
One scoping note before the procedure: a cone wrench only matters on cup-and-cone hubs. Cartridge-bearing hubs have no cone to adjust. If you are not sure which bearing design your hub runs, sort that out first.
How do you adjust a hub cone?
To adjust a hub cone, start the cone deliberately loose, tighten it in very small steps until the axle play just disappears, then lock the locknut against the cone while a cone wrench holds the cone still. The whole adjustment happens on one side of the hub. Here is the sequence we run on the bench:
- Find the cone size first. Pop the dust cap or seal and read or measure the cone flats. The size is often invisible from the outside, and the drive side and non-drive side of the same hub can use different sizes.
- Break the lock. Put a cone wrench on the cone flats and a second wrench on the locknut. Hold the cone still and back the locknut off a turn or so. On a rear hub, work from the non-drive side; the drive-side cone usually hides behind the cassette.
- Start loose on purpose. Snug the cone in until it just contacts the bearings, then back it off about a quarter turn. Starting loose and sneaking up on the setting beats starting tight and guessing which direction the knock went.
- Tighten in small bites. Turn the cone in a few degrees at a time; the angle from one spoke to the next is the scale to aim for, and final corrections land at a tenth of a turn or less. After each bite, grab the axle and rock it. The setting you want is the first one where the knock is gone and the axle still turns with no rough or notchy feel.
- Leave a trace of play on quick-release hubs. Closing a quick release squeezes the hub, and that squeeze tightens the bearing adjustment. Set the cones so a barely-there amount of play remains with the wheel off the bike; the clamp takes it up.
- Lock it down. Hold the cone dead still with the cone wrench and tighten the locknut firmly against it. Re-check the axle after locking; the locknut can pull the cone a hair as it seats, so expect to repeat the last step once or twice.
- Check at the rim. Put the wheel in the bike, clamp it, and pull side to side at the rim. The rim gives you leverage the axle does not, so play that hides at the axle shows up as a tick or a wiggle at the rim. No movement plus a free spin means you are done.
No torque numbers in that list, and that is deliberate: hub cone preload is set by feel against play, not to a published value. Firmly tight on the locknut is the whole spec.
If no cone position gives you both a free spin and zero play, the bearing surfaces are worn or pitted, and no adjustment fixes metal that is gone. That hub needs a full strip-down, inspection, and re-grease. The complete workflow, including cartridge bearings and headset cups, lives in our bearing and headset service guide; this article is the adjustment half of that bigger job.
What sizes do cone wrenches come in?
Bicycle cone wrenches run from 13 mm up to 40 mm, and the sizes that do most of the work sit between 13 and 17 mm. Which ones you need depends on whose hubs you service:
| Hub | Common cone sizes |
|---|---|
| Shimano front | 13 mm or 15 mm |
| Shimano rear | 15 mm or 17 mm |
| Campagnolo | 16 mm or 17 mm |
| Older Mavic | 14 mm or 16 mm |
The size question is messier than the table looks: cone sizes differ between front and rear hubs, and sometimes between the two sides of one hub. That is why a working bench stocks a spread rather than a pair: the Cone Wrench Set 1617/2DPCB-US packs twelve sizes from 13 to 28 mm into one kit, covering cup-and-cone hubs across road, MTB, and BMX builds plus the larger locknuts older bikes bring in.
Above the hub range, the sizes belong to threaded-headset cones and locknuts (1" through 1-1/4") and to legacy bottom-bracket and freewheel locknuts. The 1617/2DP singles run the full 13–40 mm family in seventeen individual sizes, so a 30, 32, or 36 for headset work is an add-on rather than a second set.
Set, singles, or the double-sided home wrench?
For a shop bench or a serious home workshop, the twelve-piece cone wrench set is the answer that ends the question: every bike-relevant size from 13 to 28 mm, chrome-plated, in one kit, with no mid-job discovery that the size you need is the one you skipped.
For filling gaps or going bigger, the 1617/2DP singles are heat-treated tool steel with a double-dipped grip. Tool steel matters more on a cone wrench than on almost any other wrench: the jaw is thin by design and unsupported on the open side, so soft steel loses its shape and starts chewing cone flats long before the tool looks worn.
For a home toolbox that services one family's bikes, the double-sided Hub Cone Wrench 1612/2 puts four sizes on a single wrench, matched to the cone widths most current and recent-generation Shimano hubs use. Buy two, since the adjustment takes a pair, and the cup-and-cone tool question is settled.
What is the difference between a cone wrench and a regular wrench?
Thickness. A cone wrench jaw is about 2 mm thick; a standard open-end wrench is around 7 mm. The cone's flats sit in a gap a few millimeters wide between the cone body and the locknut, and a regular wrench cannot enter that gap at all. The cone wrench gives up bulk to fit, which is also its weakness: with that little steel in the jaw, it is strictly a low-torque tool.
That cuts both ways. A regular wrench cannot do a cone wrench's job, and a cone wrench should not do a regular wrench's. Use one to muscle a pedal or an axle nut and the thin jaw spreads, and from then on it rounds every cone it touches. That is why we hang cone wrenches on their own hook: a cone wrench drafted as a beater stops being a cone wrench.
What can I use instead of a cone wrench?
For the cone itself: nothing, honestly. The flats are too shallow and the gap too narrow for a standard open-end, an adjustable wrench, or pliers; what those tools actually do is round the cone's flats, and a cone with rounded flats is a part you now get to replace. The locknut is more forgiving: on most hubs it stands exposed enough for a normal wrench to grab, so one cone wrench plus one regular wrench will carry an adjustment.
The old garage workaround is grinding a cheap open-end wrench thin. It fits after that, but a hardware-store wrench was never hardened to work at a 2 mm jaw, and in our experience the ground-down ones round off within a few services and start damaging cones. Given what a proper single costs, the substitute math has never worked for us.
Cone wrench FAQ
What is a cone wrench used for? Adjusting the cones on cup-and-cone hub bearings: setting the preload so the wheel spins freely without play, then counter-holding the cone while the locknut locks the setting in.
What can I use instead of a cone wrench? On the cone flats, nothing common substitutes safely; standard and adjustable wrenches are too thick for the gap and round the flats. A regular wrench does work on the exposed locknut.
What is the difference between a cone wrench and a regular wrench? Jaw thickness: roughly 2 mm against roughly 7 mm. The cone wrench fits the cone-to-locknut gap a standard wrench cannot enter, in exchange for being strictly low-torque.
How thick is a cone wrench? About 2 mm at the jaw, against about 7 mm for a standard open-end of the same size. The thinness is the entire point.
Unior has been forging hand tools in Zreče since 1919, and is the official technical partner of multiple World Tour and downhill teams. The cone wrench line, from the twelve-piece set to the 40 mm singles, is the hub-service side of that catalog. A cup-and-cone hub asks for ten minutes of feel once or twice a season; pay it, and the same hub outlasts most of the parts bolted around it.
Tools used in this guide
Straight from the article — no hunting through the catalog.
-
Cone Wrench Set
Regular price $114.99 USDRegular priceUnit price per -
Cone Wrench
Regular price From $9.00 USDRegular priceUnit price per -
Hub Cone Wrench
Regular price $6.99 USDRegular priceUnit price per