Bearing and headset service: a workshop guide
Workshop guide to bearing service: cup-and-cone hubs, cartridge bearing press and puller technique, headset cup install and removal.
On this page
Bicycle bearings fail in the same handful of ways across every brand, every standard, every price tier. Water gets past a worn seal. Grease dries out and stops carrying the load. Side-loaded balls or rollers pit the races, and you start hearing the bike before you feel it. The fix is almost always the same shape too: pull the bad bearing, clean the bore, press a new one in straight, and add the right grease back.
Most of the difficulty in bearing service is not the bearing itself. It's the press fit. Modern hub and headset bearings sit in shells with very narrow tolerance windows, and a bearing that goes in cocked, off-square, or impacted by a hammer face will fail again in weeks. The tools below are what we reach for to keep the bearings going in straight, the cups going in flush, and the workflow fast enough to be worth running on a bench. This guide covers the two service modes you'll meet under a modern bike (cup-and-cone hubs, cartridge-bearing hubs and headsets), the install and removal steps for each, and where each Unior tool earns its keep.
The two bearing types you'll meet under a bike
Bicycle hubs and headsets use two distinct bearing constructions, and the tools split along that line.
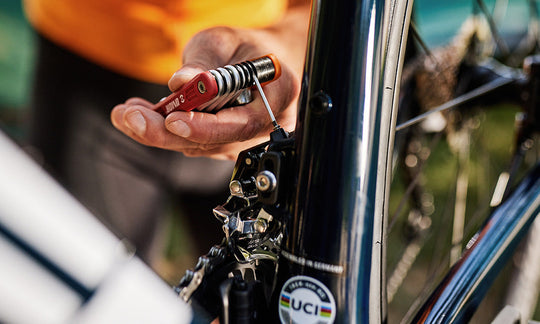
Cup-and-cone (loose ball) runs free balls between an outer cup pressed into the hub shell and an inner cone threaded onto the axle. Service means disassembling the axle, washing the balls and races, inspecting for pitting, re-greasing, and reassembling with the cone preload set against a locknut. Shimano still ships cup-and-cone on many current hubs, and the design is rebuildable for the life of the wheel if you stay on top of it. Tooling is mostly cone wrenches: thin open-end wrenches in 13–17 mm hub sizes that fit into the space between the cone and locknut where a normal combination wrench doesn't.
Cartridge (sealed) drops a complete pre-assembled bearing unit into the hub shell or headset cup. The bearing carries its own seals and grease; service means pressing the old unit out, the new one in, and that's the whole job. SRAM, DT Swiss, Industry Nine, Hope, Chris King, and most current carbon road and gravel hubs use cartridge designs. The unit gets identified by a five-digit catalog number (6001, 6802, 6902, 6903, etc.) that maps to ID, OD, and width in millimeters. Tooling is presses, drifts, and pullers sized to the bearing's outer face.
A small number of hubs blend both: a cartridge bearing with adjustable preload (the bearing-puller workflow still applies, but a cone wrench locks the preload after re-pressing). Read the hub maker's service doc before you commit to one workflow or the other.
Cup-and-cone hub service: the cone wrench workflow
Cup-and-cone service is a quiet skill that pays off for as long as you keep the bike. Pulled apart on a clean bench, the failure modes are obvious: water-rusted balls, grease that's separated into amber liquid and dry grey paste, races with the telltale brinelling rings where a ball has been parked under load. Repack with marine grease and the hub runs another season. Replace pitted balls and races, and the same shell takes another decade.
The work needs two cone wrenches at once. One holds the cone steady on the axle while the other turns the locknut against it, and the geometry of a hub locknut sitting close to a cone face means a normal combination wrench doesn't have room. The Hub Cone Wrench 1612/2 and the heat-treated Cone Wrench 1617/2DP-US both run thin enough to double up, and the 1617 covers 13 through 40 mm so a shop with one set has the whole hub catalog in reach. For threaded headsets where the locknut is even closer to the cone, the Offset Cone Wrench 1618/2DP-US makes room for your fingers in a slot most straight wrenches won't enter.
The reusable lesson from any cone wrench: snug the cone by feel, lock the locknut down against it with a hard quarter-turn, then spin the wheel and check for binding before you call it done. A bearing that grumbles after assembly is a bearing that wasn't seated; pull it apart and re-feel it. Five minutes spent here is the difference between a hub that runs five years and one that pits in five weeks. We cover the full procedure, cone sizes included, in our guide on how to use a cone wrench.
Cartridge hub service: press out, press in
Cartridge bearings sit in the hub shell on a light interference fit. You can't pry one out and you shouldn't hammer one in; both will distort the outer race and ruin a fresh bearing on install. The right tools are an inner-bearing puller for removal and a press with sized drifts for install.
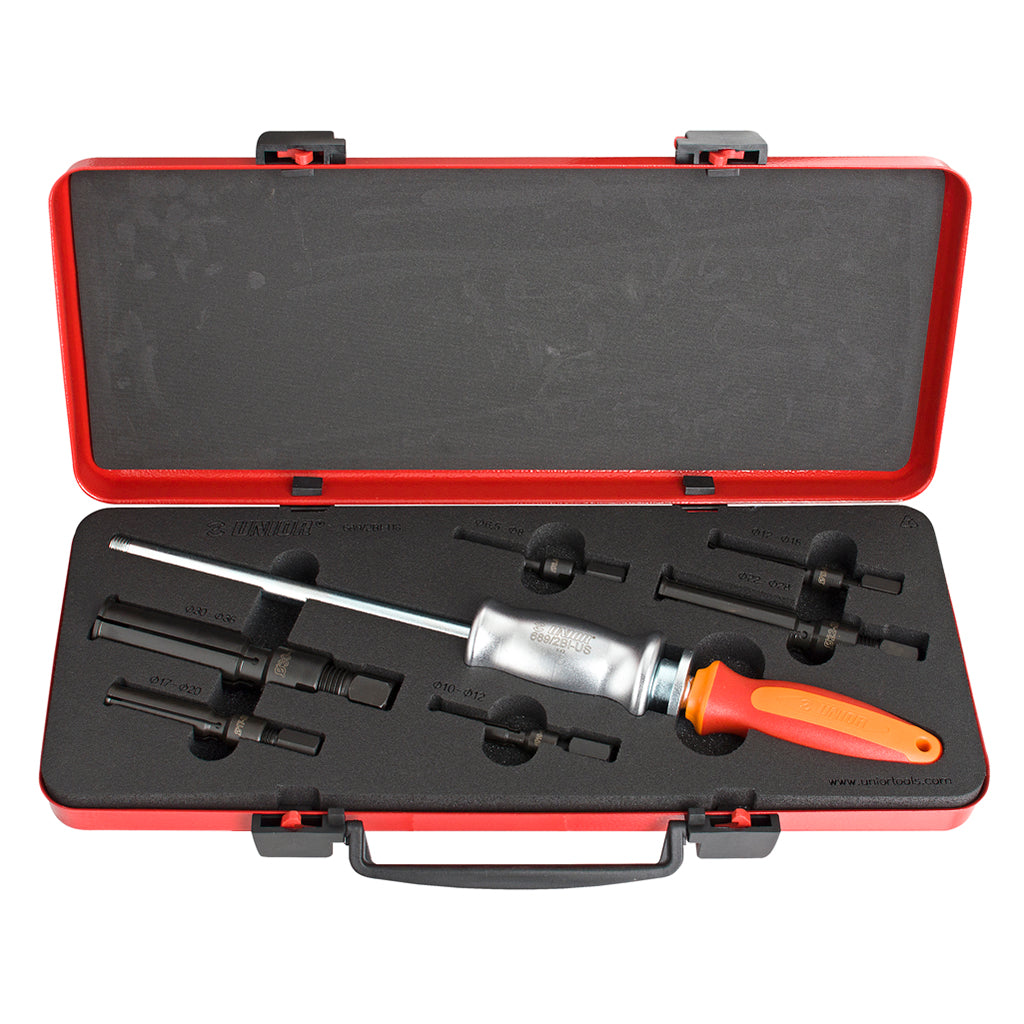
The Inner Bearing Puller 689/2BI-US is the slide-hammer-and-collet workflow. Six collet sizes (6.5–8, 10–12, 12–15, 17–20, 22–28, 30–36 mm) cover the inner-diameter range of nearly every bicycle cartridge bearing in the catalog. The collet drops through the bearing's inside, expands to grip the inner race, and the 1 kg slide hammer mounted on top draws the bearing straight out without side load. If a collet gets worn or lost, the replacement collet set 689.1/4 brings the kit back to full coverage in the same chrome-vanadium spec.
Install is the press direction, and it's where the tolerances matter most. A bearing that goes in cocked rides the inner race on the axle instead of the outer race on the shell, and it fails fast. The Unior Bearing Press Kit 1721 family carries drifts sized to the standard cartridge outside diameters; the replacement drift set 1721.1 covers the catalog when older kits don't include every modern size. The drift presses on the bearing's outer face only (never the inner race, never the seal), and the Bearing Drift Protection Plate 1721.2 sits between the drift and the bearing to protect the seal lip during the final press strokes. The Bearing Press Handle and Shaft 1721.4 is the rebuildable spine of the press itself; the Quick-release Handle 1721.3 speeds the workflow on benches that see daily bearing changes.
For hubs with shouldered axles (current DT Swiss, Industry Nine, and most thru-axle hubs where the bearing seats against a step in the axle rather than against a shell shoulder), the standard press doesn't reach past the axle shoulder. The Over Axle Bearing Press Set adds adapters sized for the 10, 12, 15, 17, 18, and 20 mm axle envelopes, with the matching 6000-series and 6800-series bearing OD adapters laser-etched for quick identification at the bench. The set extends the 1721 press into shouldered-axle territory without forcing a different press purchase.
For axle work that isn't bearing-pressing (regreasing a cup-and-cone hub, replacing an end cap), the Hub Genie 1758/4 pulls 12, 15, or 20 mm thru-axle end caps off without prying. The expanding mechanism grabs from inside the cap so the cap face stays unmarred. And the Axle Vise 1639/2 holds 9 and 10 mm axles in a bench vise without crushing the threads, which matters as much for the next reassembly as for the current one.
Headset service: install, remove, prep
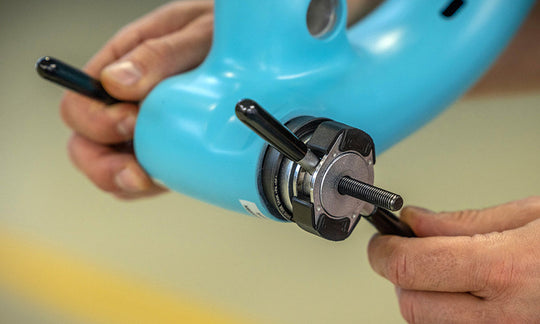
Threadless headsets seat their cups into the head tube on a press fit just like hub bearings, and the same logic applies: pressed in straight, the cups carry the front-end load for years; pressed in cocked, they'll wear unevenly and pull the bike off-line. The Headset Bearing Cup Press 1680/4 handles 1" through 1.5" cups with a thrust bearing at the top so the cup doesn't rotate during the press, and a quick-release on the lower side that saves the time normally spent threading the press body up the full stack.
Removal is the harder direction. A cup that's been seated for five years won't drop out, and you can't reach behind it from the head tube's other end with a normal driver. The Unior headset cup remover family uses spring-loaded tool-steel flanges that slide through the cup's inside diameter, then spring out past the cup's back skirt to catch it from behind. The Headset Cup Remover 1681/4 covers the 1.0–1.25" range (most road and older MTB head tubes); the Headset Cup Remover 1681.1/4 covers the 1.25–1.5" range (tapered head tubes, most current MTB and gravel). The 1681.1/4 also fits PF30 bottom bracket cups, which is the cleanest crossover in the catalog: one tool, both jobs.
Steerer prep is the last piece. A new fork comes with a long steerer that has to be cut to stack height before the stem clamps it, and getting the cut square matters because a cocked cut means the stem clamps unevenly. The Gauge for Steerer Tube Cutting Guide 1604.1/2PLUS pairs with the Unior saw cutting guide: set the gauge to the desired steerer length, read the cut position through the windows over the slots, and the saw lands square the first time.
Cheat sheet
| Job | Tool |
|---|---|
| Wash and repack cup-and-cone hub | Cone Wrench 1612/2 or 1617/2DP-US |
| Threaded headset cone and locknut | Offset Cone Wrench 1618/2DP-US |
| Pull a cartridge bearing out of a hub | Inner Bearing Puller 689/2BI-US + replacement collets 689.1/4 |
| Press a cartridge bearing into a hub | Unior Bearing Press 1721 family (drifts 1721.1, handle 1721.4, QR handle 1721.3, protection plate 1721.2) |
| Press bearings into a shouldered-axle hub | Over Axle Bearing Press Set |
| Remove a thru-axle end cap | Hub Genie 1758/4 |
| Hold a 9 or 10 mm axle in a bench vise | Axle Vise 1639/2 |
| Press a 1.0–1.5" headset cup | Headset Bearing Cup Press 1680/4 |
| Remove a 1.0–1.25" headset cup | Headset Cup Remover 1681/4 |
| Remove a 1.25–1.5" headset cup or PF30 BB cup | Headset Cup Remover 1681.1/4 |
| Cut a steerer to length | Gauge for Steerer Tube Cutting Guide 1604.1/2PLUS |
Catch a bearing before it gets dragged out by side load and the same hub runs another full season. Catch it after, and you're replacing the hub. The tools above are the workshop side of that decision; the rest is paying attention to the bike.