When and how to replace your chain
How to tell when your chain is worn, why a worn chain damages your cassette and chainrings, and how to break and reinstall cleanly with the Master Chain Tool.
On this page
Bicycle chains wear out. Not in a dramatic way; they don't snap on the climb, usually. They quietly stretch, link by link, and that quiet stretching is what eats your cassette teeth and chainrings. Caught early, a new chain runs roughly $30–80 plus about half an hour of work. Caught late, you're replacing chain plus cassette plus (often) a chainring, which usually lands at several times the cost depending on tier.
This guide walks through how to know your chain is worn, why a worn chain damages everything downstream, and how to break and reinstall a new one cleanly with the Master Chain Tool. We'll cover the differences that matter (Shimano vs. SRAM master-link vs. Campagnolo peening) and where mechanic-grade tools earn their keep.
How to know your chain is worn
The clean answer: measure it.
Chain wear is the elongation of each link beyond its nominal pitch (12.7 mm per link). Once a chain stretches past about 0.5% (for 11- and 12-speed) or 0.75% (for 10-speed and below), it stops meshing with the cassette teeth the way it should. The cassette teeth start carrying the chain at angles they weren't shaped for, and they reshape themselves to match. That makes them incompatible with a new (correctly-sized) chain when you finally swap.
A chain wear indicator drops into the chain at the correct depth and reads which percentage you're at. Unior's Chain Wear Indicator 1644/6 reads both the 0.5% and 0.75% thresholds on opposite ends of the same tool, so you can check either without switching gauges. The three-point design separates pin wear from roller wear, which keeps the reading honest on chains where the rollers have slop but the pins are still tight. If you don't have an indicator on hand, a 12-inch ruler measuring pin-to-pin across 12 links gets you close, but the indicator is faster and harder to misread.

Visual signs come too late to be useful. By the time you can hear chain skip under load on the cassette, the cassette is usually past saving. Same for "the chain just looks dirty"; that tells you nothing about elongation.
Why worn chains cost you money
A new chain on a worn cassette is the most common drivetrain mistake. The chain skips under load on the rear cogs you use most, usually the middle three or four, because those cog teeth have reshaped themselves to fit your old, stretched chain. The new chain doesn't fit the deformed teeth, and the only way to make it fit is to wear the new chain back down to match. (Or, more often, return it and buy a new cassette.)
Three components are in play:
- The chain itself. Replaceable. Ballpark $30–80 depending on speed and brand.
- The cassette. Replaceable. Ballpark $50–250 depending on quality. Catches the chain at every shift; deformations accumulate quickly when a worn chain is left on.
- The chainrings. Replaceable, but usually require crankarm removal. Ballpark $40–200 each. The big ring on a road bike is the most likely casualty; small ring takes less load.
Catching the chain at 0.5% wear means swapping just the chain. Catching it at 0.75% usually means swapping the chain plus the cassette. Catching it past 1.0%, which is where most "the bike sounds funny" calls land, typically means all three.
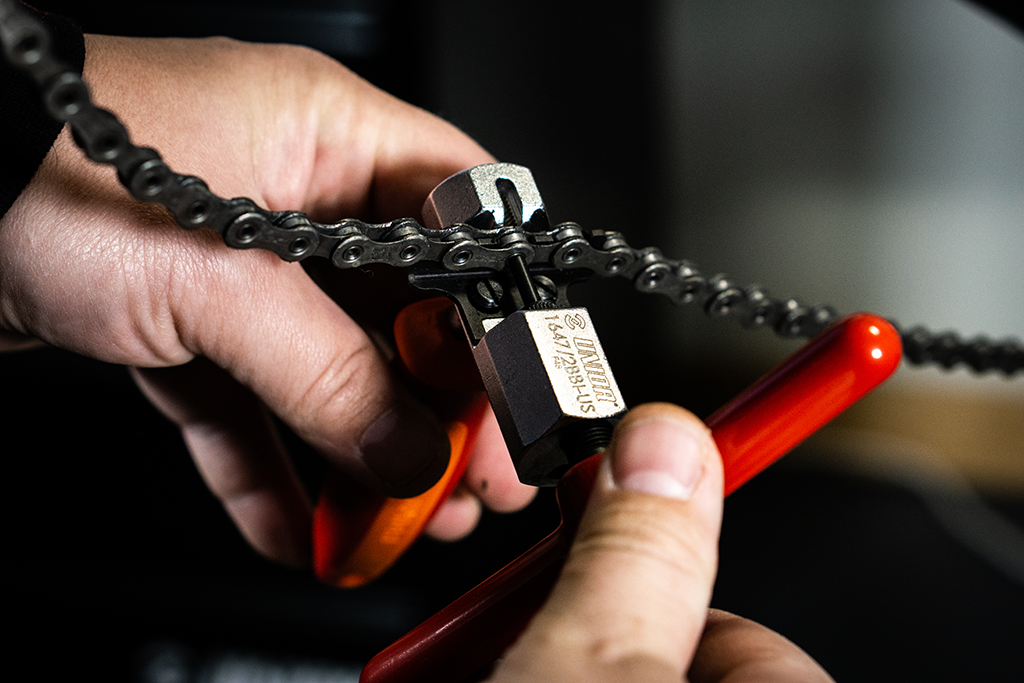
How to break a chain
A chain breaker pushes the connecting pin out through the side plates, which releases the link. The process is the same whether you're removing a chain that's done or sizing a fresh one to length.
Before you push the pin, get the chain into a working position. We shift to small-small (small chainring, smallest sprocket) before breaking a chain that's still on the bike; that relaxes the rear derailleur spring and gives you slack to work with. For bench work, the chain comes off the drivetrain entirely. If you're sizing a fresh chain, the old chain is your template: count its links and match. If you're starting from scratch, run the new chain around the largest chainring and largest sprocket without going through the derailleur cage, then add two full links to the closest pin. That's the canonical road / MTB size.
Set the chain on the floating support insert. For most chains, the pre-installed single-link support is the right one. The chain plate sits in the support and the driving pin is centered behind it. For stiff or fresh chains where the link won't slide cleanly, the wider double-link support gives the chain plate more surface area to register against, which keeps things steady under the leverage from the handle. SRAM AXS flat-top chains use the dedicated AXS insert. The flat-top plate geometry is taller and asymmetric, and the standard supports don't engage it correctly; using them anyway risks the pin pushing through at an angle and ruining the outer plate.
Turn the handle smoothly until the pin breaks free from the inner plate. Stop before you push the pin entirely through the outer plate. Leave a few millimeters of pin engaged so you can reinstall later (if you're sizing) without dropping the pin into your chain stay.
Common failure modes:
- Off-center pin push. Caused by the chain plate not sitting flat against the support. The pin pushes through at an angle, the outer plate distorts, and the link won't pivot smoothly when reinstalled. Fix: take more time to seat the chain in the support. The floating support is supposed to do this for you, but a tilted workstand or a chain still bolted to the bike can fight it.
- Pin won't move. Cassette and chain stay clean for years on shop floors and rust shut on bikes that get hosed off. A drop of penetrating oil on the outer plate, five minutes of waiting, then try again.
- Spindle threads gritty. Wipe the threads and add a drop of light grease. The Master Chain Tool's spindle is precisely-made and should feel smooth from new. If it doesn't, it usually means grit got in during transport or storage.
For a quick reference, the break itself is five steps:
- Get the chain into position. Shift to small-small if it's still on the bike, or remove it from the drivetrain for bench work.
- Choose your insert: single-link for most chains, double-link for stiff or fresh ones, AXS insert for SRAM flat-top.
- Seat the chain in the support so the plate sits flat and the driving pin is centered behind it.
- Turn the handle smoothly until the pin breaks free. Stop with a few millimeters of pin engaged if you're sizing for reinstall.
- Inspect the outer plate. If the pin pushed off-center, the link won't pivot cleanly when reinstalled; break it again at a different pin if necessary.
How to reinstall: master link vs. peening
Modern chains reinstall in one of two ways, and the difference matters because the tools don't always overlap.
Master link (SRAM PowerLock, KMC MissingLink, Shimano Quick-Link)
Most 11- and 12-speed chains typically ship with one or two master links (purpose-built quick-link plates that snap together). To install: route the chain through the front derailleur cage and over the rear derailleur jockey wheels first, then feed the two open ends together. Drop the master link halves in from opposite sides and press the chain forward against the rear derailleur until the link clicks home. Most home mechanics get the routing wrong on the first try; double-check the cage and jockey-wheel paths before the click home.
Some master links are one-use. We replace SRAM PowerLocks on 12-speed and above rather than reusing them. Other quick-link designs (like KMC's MissingLink) are made for repeated use. Check the manufacturer's spec for the specific chain you're installing before deciding to reuse a link.
Peening (Campagnolo)
Campagnolo road chains 11-, 12-, and 13-speed reinstall via a connecting pin that's pressed into the outer plate, then peened (flared at both ends) to lock it in place. This requires a chain tool with a peening function. The Master Chain Tool's spindle pushes the pin in; a separate pin blocker holds the second outer plate against the work surface so the pin doesn't drift through both plates while you push.
The Master Chain Tool's hidden compartment in the body holds a replacement chain pin, the universal kind used for emergency reinstall when a master link isn't an option. It's there for the day you snap a chain mid-ride and discover the master link is in the cassette drawer at home.
Compatibility cheat sheet
| Drivetrain | Speeds | Reinstall method | Master Chain Tool insert |
|---|---|---|---|
| Shimano road / MTB | 11, 12 | Quick-Link or replacement pin | Standard (single or double-link) |
| SRAM road / MTB (non-AXS) | 11, 12 | PowerLock (12-speed PowerLocks are one-use) | Standard (single or double-link) |
| SRAM AXS road / Eagle | 12 | Flat-top PowerLock | AXS insert required |
| Campagnolo road | 11, 12, 13 | Peening | Standard support + pin blocker |
| Vintage / single-speed | 1–10 | Replacement pin or master link (1/8″) | Standard or double-link |
The Master Chain Tool covers every row in this table: derailleur compatibility from 6–13 speed, SRAM AXS via the dedicated support, Campagnolo peening via the included pin blocker, and 1/8″ single-speed support for shop bikes and one-speeds.
Our shop pick
The Master Chain Tool is the chain tool we reach for in our own workshop and the one we recommend to anyone who works on more than two or three bikes a year. The modular insert system is the differentiator. Most chain tools force one geometry for every chain, which means coaxing AXS or Campagnolo plates into a fit that wasn't designed for them. The Master Chain Tool ships with the right inserts for the chains people actually ride, and the floating chain support keeps the pin centered through the push. It's a tool that earns its space on the bench.