How to Replace Bike Hub Bearings: Identify, Pull, Press, Check
How to replace bike wheel bearings in a sealed cartridge hub: read the code or measure, pull the old ones, press new ones on the outer race, check for play.
On this page
- Cartridge or cup-and-cone? Settle that first
- Signs your wheel bearings are worn out
- Read the code on the seal, or measure the bearing
- Cassette off, end caps off, axle out
- Getting the old bearings out: drive-through or blind pull
- Press the new bearings in on the outer race only
- Check the hub before the wheel goes back in
- Do you need a new hub?
- Pro tip from our mechanics
Replacing sealed cartridge hub bearings, the wheel bearings of a bike, takes five steps. Read the size code off the old bearing’s seal (or measure it with a caliper), then take the end caps and axle out. Pull the old bearings with a blind collet puller, or drive them through if the hub has a loose spacer, press the new ones in on the outer race only until they seat, and check that the hub turns smoothly with no axial play before the wheel goes back in the frame. In the Unior service manual a cartridge bearing comes out only to be replaced, once it no longer turns smoothly by feel, and DT Swiss’s front hub manual fits new bearings at every full hub service. The background on bearing types lives in our bearing and headset guide; this page is the hands-on procedure. Bottom brackets and headsets are separate jobs: press-fit bottom brackets and step 4 of our frame prep guide. On our bench this comes up most on wheels that have run a few wet seasons, and the puller and press below are the same ones the Unior manual uses.
Cartridge or cup-and-cone? Settle that first
A cone wrench matters only on a cup-and-cone hub; a cartridge hub has no cone to adjust, and the construction difference is spelled out in our guide to the two bearing types. If yours is cup-and-cone, our cone wrench guide covers that adjustment and nothing below applies.
Signs your wheel bearings are worn out
Play, stiffness, or noise from the hub can all mean worn bearings, and where wear is the cause, DT Swiss’s troubleshooting table gives one fix: replace them. For play and stiffness the same table also lists assembly faults: bearings mounted wrong, the non-drive bearing pressed too tight, or the fitting order not followed. The in-service check in DT Swiss’s manual looks for the same things: the hub must turn smoothly with no play between hub and axle, and play or a heavy, rough feel calls for a full service, which fits new bearings. DT Swiss’s manual gives no lifespan for the bearings. It sets a service interval instead: a small service (check, clean, grease) every three months in normal conditions, as needed when you ride regularly in dust, rain or snow, and a full service only when the check calls for one. The seasonal play check is covered in our fall bike check-up; this article picks up when a hub fails it.
Read the code on the seal, or measure the bearing
Order the new bearings before anything comes apart, with the same reference number as the ones coming out. Unior’s 1721 instructions identify a bearing either by the code on its seal or by its inner and outer diameters measured with a vernier caliper, and Unior’s adapter table lists bore and outside diameter for the common hub codes:
| Code on the seal | Bore x OD (mm) |
|---|---|
| 6900 | 10 x 22 |
| 6000 | 10 x 26 |
| 6901 | 12 x 24 |
| 6001 | 12 x 28 |
| 6802 | 15 x 24 |
| 6902 | 15 x 28 |
| 6803 | 17 x 26 |
| 6903 | 17 x 30 |
| 6804 | 20 x 32 |
| 6805 | 25 x 37 |
The last two digits are the bore code, and Timken’s catalog gives the rule: 00 is 10 mm, 01 is 12, 02 is 15, 03 is 17, and from 04 upward you multiply by five. Letters after the number are supplementary codes, and NSK’s designation guide says they can be unique to each maker. They do not change the size; the number sets that. Some makers print the same size under a different number (61803 is one you will meet), so treat an unfamiliar code as a measurement job.
The code also sets the width, which the table leaves out. The manual records width only for its two worked hubs, a rear 6903 at 17 x 30 x 7 mm and a front 6901 at 12 x 24 x 6 mm, so measure yours and order to all three numbers. If the seal print is gone, buy to the measured bore, outside diameter and width; non-standard sizes (15 x 26, 17 x 28) do turn up in hubs. The Vernier Caliper 271 reads 0–150 mm with 0.02 mm accuracy and needs no battery; a spoke and bearing gauge reads loose-ball diameters only and cannot size a cartridge bearing.
Cassette off, end caps off, axle out
On a rear hub the cassette comes off first; our cassette guide covers that. Lay the parts on a clean rag in the order they came off; reassembly runs the same steps backward.
On many thru-axle hubs the end caps are press-fit plugs. DT Swiss pulls them off by hand or, when one will not come, clamps it in a vise with ground, aluminum or plastic jaws and lifts the wheel off it; roughened jaws damage caps. Our way around the vise is the Hub Genie, which expands inside the cap and pulls it square off the hub without prying; it comes in a 12 and 15 mm thru-axle version (a 20 mm version also exists), and its page covers fit and seized caps. On a quick-release hub the axle is threaded, 9 mm at the front and 10 mm at the rear, and the Hub Genie does not apply; if that axle has to be held, the Axle Vise 1639/2 is the QR-only option. How the axle itself comes out is hub-specific, so the maker’s manual is the reference for your caps, your axle, and every torque figure; we give none here.
Getting the old bearings out: drive-through or blind pull
How the hub is built decides the removal method: a loose spacer between the bearings lets you drive each one out from the far side, while a shoulder or a blind bore calls for the collet puller. Before either, with the axle out, measure the inner diameter of both bearings, because the two sides of one hub do not always read the same; the manual’s rear example read about 16.99 mm on one side and 16.82 mm on the other, both nominally 17.
Drive-through is DT Swiss’s method: push the spacer slightly aside, tap the first bearing out with a suitable punch, flip the hub, and drive the second out off the spacer. On some DT hubs you tap the axle itself with a plastic hammer instead.
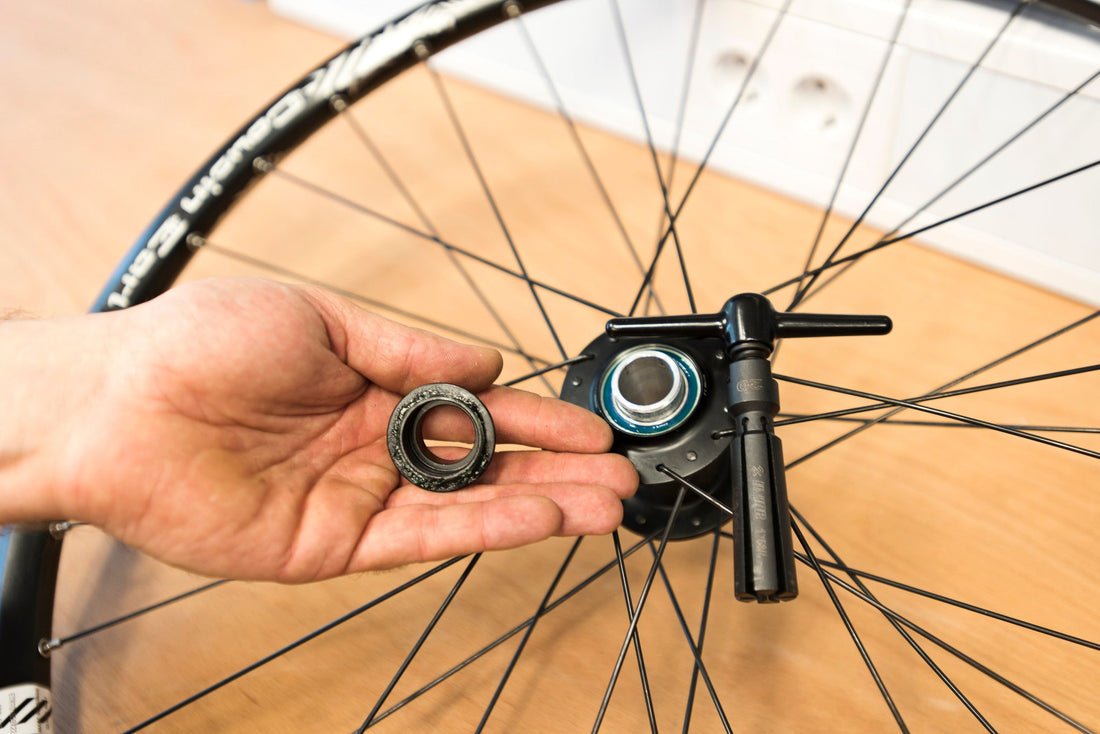
The blind pull is the Unior manual’s method. Many mechanics drive hub bearings out with a punch and hammer; the manual calls that less precise and does not recommend it, because a punch can damage the bearing seat, and a damaged seat can leave play after reassembly. The tool is the 689/2BI blind puller: an expanding collet on a 1 kg slide hammer, with six collets covering 6.5–36 mm bores, chosen by the inner diameter you just measured (spare collets are sold singly). Pass the closed collet through until its expanding edge sits behind the bearing’s far face, tighten the expander bolt until the tool sits firm, then hold the wheel firmly, since this is still an impact method, and run the slide hammer outward. A few blows should bring the bearing out without harming the hub. Repeat on the other side.
Press the new bearings in on the outer race only
Clean the parts, wipe the bearing seats dry, and grease them lightly; DT Swiss also greases the inside of the shell. All fitting force in DT Swiss’s manuals goes on the bearing’s outer ring, and the 1721 press adapters are sized for that. Check the hub maker’s data for orientation and order first, because some bearings must face a certain way.
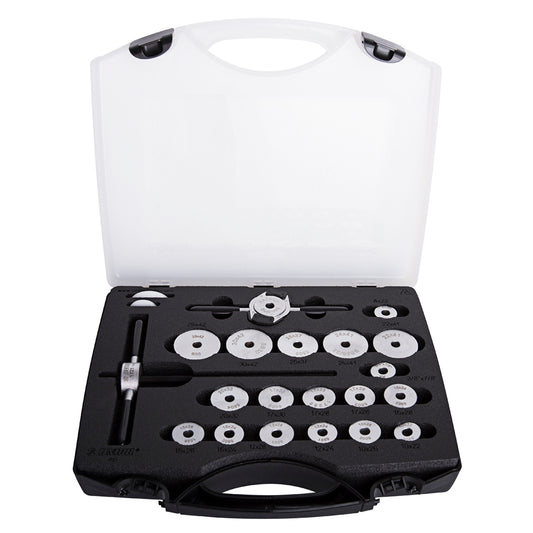
The 1721 is a hand-turned threaded spindle with two handles and adapters labeled by bearing size; the 1721.1 drifts are sold one size at a time. Put the matching adapter and the bearing on the spindle, slide it through the hub, and fit a spacer on the far end so the opposite handle bears on it rather than on the hub flange; then tighten, keeping the adapter and spindle in line with the bore. Rising resistance means the bearing has met its seat. Never force it: a bearing that goes in at an angle loads one side of the race and can damage the hub.
In Unior’s order, both new bearings go into the empty shell before the axle, and the first one guides the spindle for the second. DT Swiss runs the other order on its 180 and 240 front hubs: the first bearing goes in with the axle fitted, and the second is driven in over the axle with DT’s axle tool centering the installer so it cannot tilt. On a stepped axle a standard drift has nowhere to sit; Unior’s Over Axle Bearing Press Set extends the 1721 to 10 to 20 mm axles, and its page maps each axle size to its bearing codes.
Check the hub before the wheel goes back in
Grease the axle threads and the surfaces the bearings ride on, then slide the axle back in from the drive side; on a rear hub, hold the pawls down so the cassette body can pass (our chain-skipping guide covers freehub engagement). Refit spacers and end caps in their original order and orientation, and if your hub has an adjustable preload nut or ring, set it the way the hub maker specifies.
Then test as DT Swiss does. Hold the hub and move the axle along its own axis: no axial play. Hold the axle and turn the shell: it should turn smoothly. If it binds, back the bearing off slightly; if there is play, seat it a little further, pressing on the outer race only; repeat until it turns smoothly. A rebuilt rear hub should drop into the dropouts easily; if it does not, something is out of place. Once the wheel is back in the frame, check the adjustment again; the Unior manual ends its procedure on that check.
Do you need a new hub?
Not for worn bearings. In DT Swiss’s full service the old bearings come out and new ones are pressed into the same shell. The exception is a damaged bearing seat, the risk the Unior manual attaches to punch-and-hammer removal. No source sets a rule for when a damaged shell must be scrapped; if a new bearing sits loose in its seat, ask the hub maker.
Pro tip from our mechanics
Measure both bearings before you order, including the one that still feels fine. The two sides of one hub do not always match, and a pair ordered off one seal can leave the wheel apart on the bench waiting for a second parts order. Reading both seals and taking two caliper readings is the quicker route.
Unior has been forging hand tools in Zreče, Slovenia, since 1919. Pulling and pressing hub bearings is the work the 689/2BI puller and the 1721 press were designed for, and the service manual we learned the method from is Unior’s own. The rest of that range is in our bearing tools collection.
Tools used in this guide
Straight from the article — no hunting through the catalog.
-
Inner Bearing Puller
Regular price $419.99 USDRegular priceUnit price per -
Universal Bearing Press
Regular price $299.99 USDRegular priceUnit price per -
Over Axle Bearing Press Set
Regular price $199.00 USDRegular priceUnit price per -
Vernier Caliper, 0-150mm
Regular price $39.99 USDRegular priceUnit price per -
Deadblow Hammer
Regular price $36.99 USDRegular priceUnit price per




Frequently asked questions
Is changing a hub bearing easy?
On a sealed cartridge hub the job is simpler than overhauling loose-ball bearings, though it needs dedicated tools: a caliper to size the bearing, a way to get the end caps off, a puller or punch to remove the old bearings, and a press that bears on the outer race only. For hub-specific details such as cap removal, bearing orientation and order, follow the hub maker’s manual.
How do I know if my hub bearings are bad?
Take the wheel out and hold the hub. It must turn smoothly with no play between hub and axle. DT Swiss’s troubleshooting table lists axial play, a stiff-turning hub and hub noise as worn-bearing signs, and where the bearings are worn, the fix for each is new bearings. Once a cartridge bearing no longer turns smoothly by feel, it comes out and a new one goes in.
How long do bike hub bearings last?
No lifespan for hub bearings appears in DT Swiss’s manual. It sets a service interval instead: a small hub service (function check, cleaning, greasing) every three months in normal conditions, as needed if you ride regularly in dust, rain or snow, and a full service with new bearings only as needed, meaning when the hub shows play, runs rough or makes noise.
Can I replace the bearing without replacing the hub?
Yes. In DT Swiss’s full hub service the old bearings are removed and new ones are pressed into the same shell. The exception is a damaged bearing seat. The Unior service manual warns that punch-and-hammer removal can damage the seat, and a damaged seat changes how the new bearing fits and can leave play after reassembly. That is why Unior’s manual pulls bearings with a collet puller rather than a punch.
What is the best tool for removing wheel bearings?
That depends on how the hub is built. With a loose spacer between the bearings, DT Swiss pushes the spacer aside and taps them out with a punch from the far side; on some DT hubs the axle itself is tapped out with a plastic hammer instead. With a shoulder in the bore, or to keep the bearing seat untouched, a blind collet puller such as the Unior 689/2BI passes through the bearing, expands behind it and draws it out with a slide hammer; Unior’s manual prefers it because a punch can damage the seat.
How do I remove a stuck wheel bearing?
Don’t lever it out sideways: a cartridge bearing is a light press fit in the shell, and prying distorts it. The way the hub is built decides the method. With a loose spacer between the bearings, DT Swiss drives each bearing out from the far side with a punch. With a shoulder or a blind bore, use a collet puller sized to the bearing’s inner diameter, such as the Unior 689/2BI; its collet expands behind the bearing, and a few slide-hammer blows draw it out.
How do I know what size hub bearings to buy?
Order the number printed on the old bearing’s seal. Its last two digits are the bore code: 00 is 10 mm, 01 is 12, 02 is 15, 03 is 17, and from 04 up you multiply by five. Letter suffixes vary by maker; the number sets the size. If the print is gone, or the code is one you don’t recognize, measure bore, outside diameter and width with a caliper and buy to those three figures. Measure both bearings, because the two sides of one hub do not always read the same.